When I’m undertaking any form of alpine mountaineering or ice climbing, I always end up using my ice axe. Extensively. I’ve tried to always take proper care of my ice axes to prolong their serviceable life and give me the peace of mind that my equipment is safe to use and in good condition.
In this article, I will unpack ice axe maintenance, from the basics to sharpening and signs that your axe should be replaced.
Ice Axe Basics
The different parts of an Ice Axe
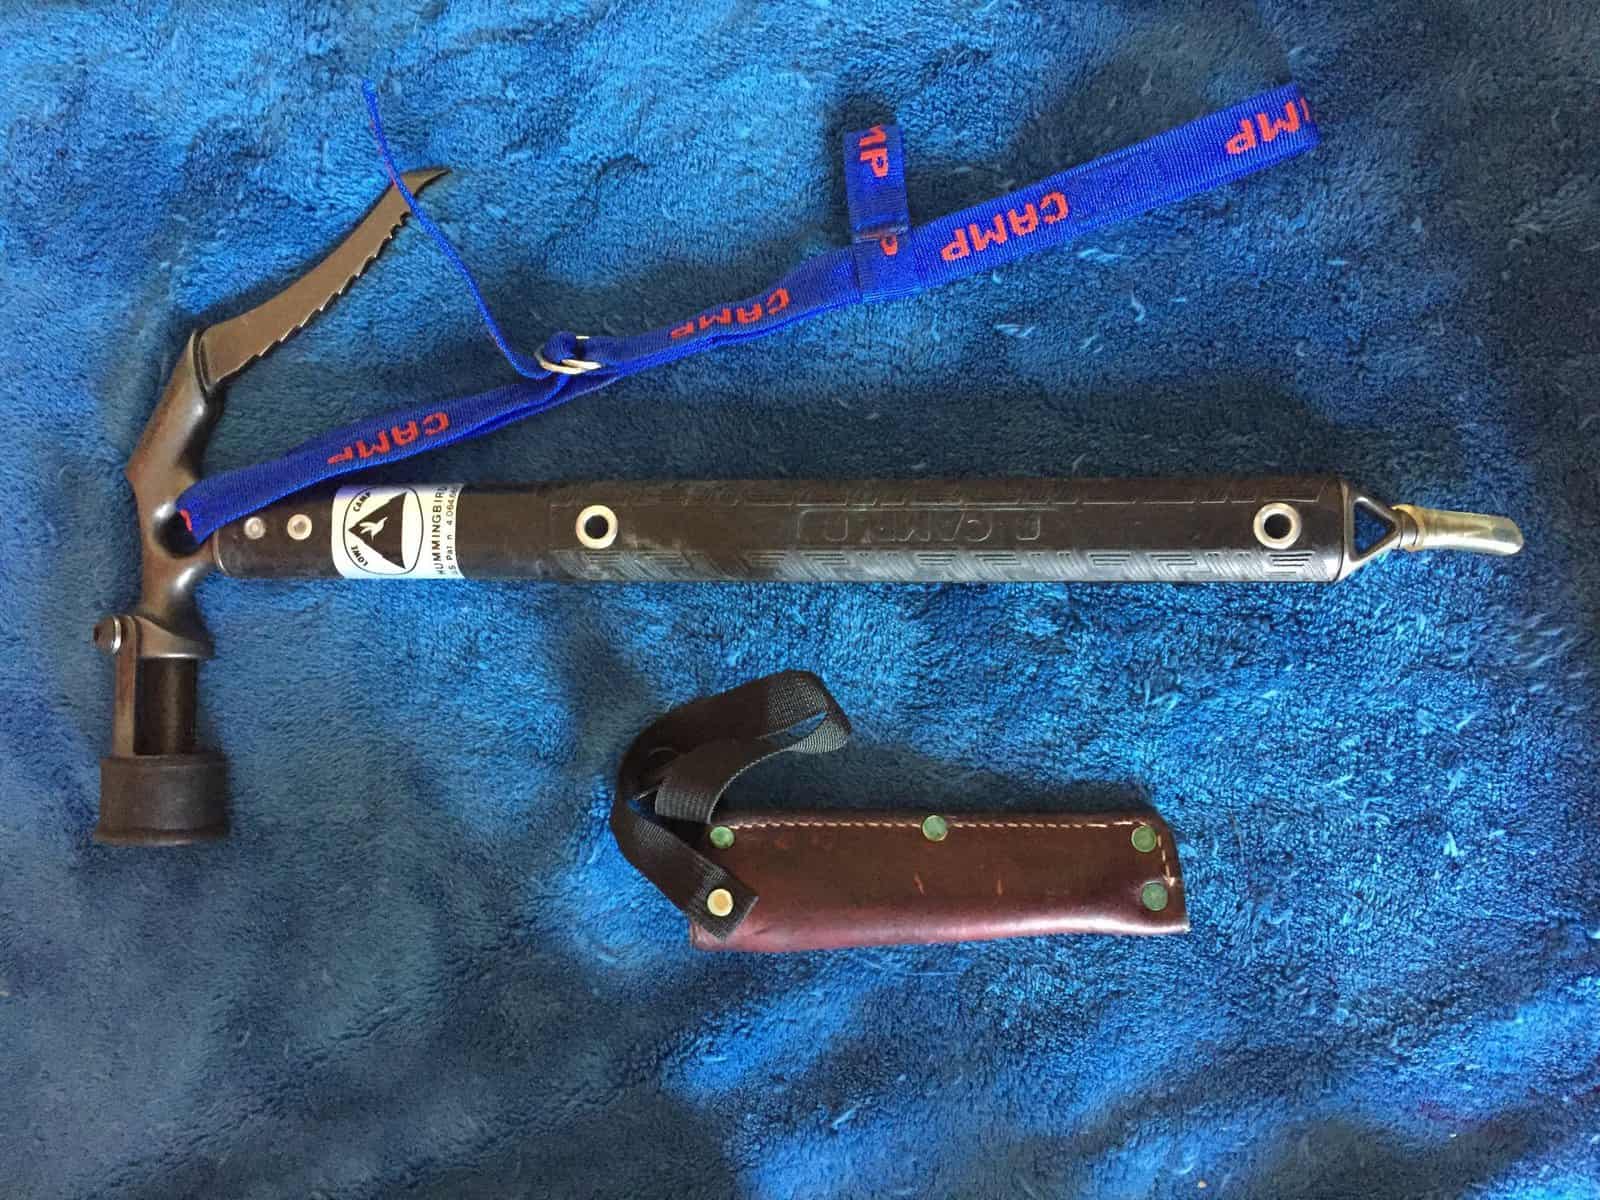
An ice axe consists of various parts, namely adze, head, shaft, spike and pick. Each of these has a specific function and should be cared for in a specific way.
Depending on the intended use of the ice axe, the size and shape of each part would also change.
For example, for cross-country travel and scrambling, a longer axe is used, while alpine climbing and steeper slopes require a shorter axe.
Ice climbing axes are even shorter, with more focus on the shape of the adze, teeth placement and pick droop. I won’t go into detail here, but you get the picture.
The ice axe head is usually made of steel, which is strong enough to use for snow and ice climbing. Here, you’ll find a hole, called a carabiner hole, but which is used for attaching the wrist leash.
Ice axe shafts are often covered with rubber in order to improve the grip. If you have an axe without a rubber grip cover, you can usually add one later, if you want.
Do’s and Don’ts for Ice Axes
There are some basics that will apply to most of your gear.
First off, don’t leave your stuff lying around. If you leave your gear on the floor, or worse, drop it on the floor, it can get stepped on and suffer other forms of damage.
If you drop your ice axe on a hard surface, the point could get dull or damaged. So, take care of your gear by keeping it off the floor.
This extends to storage – if you store your gear in a dry place away from harsh chemicals, it will probably last longer. Make sure that your ice axe is dry by the time you pack it away.
The life expectancy of an Ice Axe
Keep the service life of your product in mind. The manufacturer will have a recommended service life for each piece of gear.
This is usually ten years, but can vary according to the type of equipment and the specific manufacturer.
Ice axes tend to have a longer lifespan and can stretch indefinitely if you take good care of it. If you’re not sure how old your equipment is, check for a serial number. Nowadays, many manufacturers print, engrave or laser cut a serial number on their products, allowing you to check the manufacturing date online.
When you’re out in the mountains, it’s easy to get your gear mixed up with someone else’s. Since gear is expensive, you want to keep tabs on it, so you’ll want to mark it.
You can’t stamp or engrave your name on an ice axe. Doing so will most likely damage it, since the action of stamping or engraving modifies the thickness of the steel it’s made of. Immersing it in paint is also not a good idea, since the surface texture would then change.
Using a paint pen or a thin layer of metal-marking paint somewhere near the serial number is your best bet – you may have to redo the markings every once in a while.
I have also used a piece of tape on a part of the handle that I don’t generally use. It does the job.
Tips for cleaning your Ice Axe
Right after using your gear, while you’re still outdoors, give your axe a good rinse with fresh water if possible and wipe it down with a dry cloth.
This is especially important if you were using it near the ocean, since salty water, or even the salt in the ocean air, could make the metal of your axe rust even more than it would under normal snowy conditions.
Once you get home, the proper cleaning will start.
Follow these steps when cleaning you ice axe:
1. If you got any oily dirt or mud on your axe, use a small brush to get if off.
2. Wash your axe properly in some lukewarm soapy water.
3. Scrub it a bit if there’s stubborn dirt on it.
4. When this is done, rinse it thoroughly in clean tap water to remove all the soap.
Don’t use any harsh detergents on your gear, such as WD 40 type degreasers. These are abrasive to the metal, decreasing the service life of your axe.
Also take into account that your axe probably has some rubber on the handle, which might not be compatible with all types of soap. Use an appropriate soap to prolong the lifespan of your axe handle.
After cleaning, wipe your axe with a clean cloth to dry it. Let it dry properly before you store it.
Keep Rust off your Ice Axe
Ice axes are made of high strength steel and usually aren’t treated for rust prevention.
For this reason, some traces of rust will probably appear on your axe right after you’ve used it. These you can get off by using an abrasive sponge, like the one you’d scour your dishes with.
If you don’t get all of these small traces, don’t worry. The small traces of rust you see won’t affect the performance or lifespan of your ice axe.
It’s the big, deep rust pockets you should worry about. Rust traces will probably get worked off the next time you use your ice axe.
To avoid serious rust on your ice axe, wipe it dry after each use. When storing your axe, you can coat it with a light layer of oil or silicone grease.
Ice Axe Sharpening Tricks
Ice axe blades get dull with use. This is a no-brainer. Sharpening them is essential if you want proper performance from your gear.
First, you need to remove the pick. Use a tube socket for this – compatible sockets are usually available from your nearest hardware store, although sometimes you might need a brand-specific one. You’ll quickly figure out what works with your specific axe.
Use a hand file to sharpen the blade. If you use an electrical file or grinder, you will generate too much heat, affecting the microscopic structure of the steel and weakening it. In my opinion, this is not a good idea.
A flat metal hand file is best for this process. Some manufacturers recommend cooling the blade at intervals during the sharpening process in order to avoid overheating, although some people say that this is a waste of time.
A rule of thumb to go by: if it gets hot, cool it down a bit before you carry on. If it doesn’t get hot, don’t worry about it.
During the filing process, it’s easiest to use a benchtop vice or clamp to hold the blade securely, since this would make your job so much simpler. If you don’t have one, you can hold the blade in one hand and file with the other, although this would be tedious and take forever. You also run the risk of cutting your hands in the process.
Techniques for sharpening your Axe
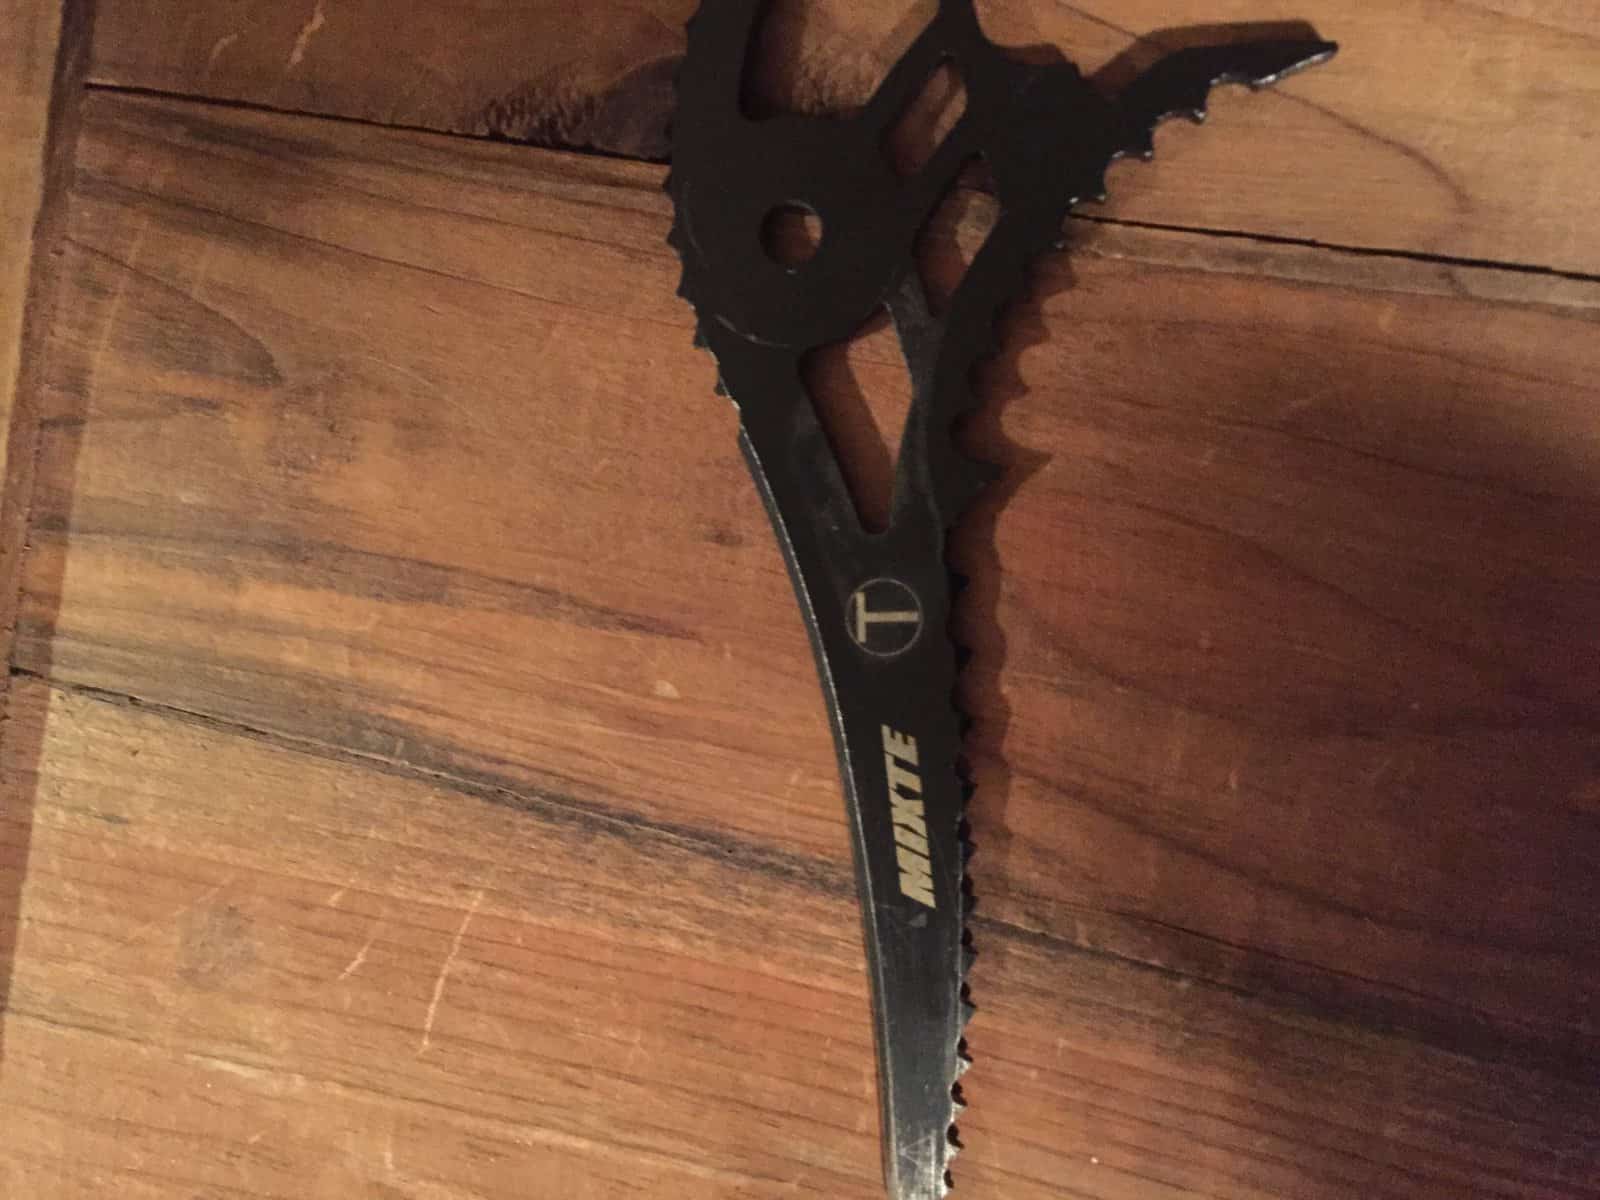
You want your blade to have sharp angles and points in order to grip the ice properly. As you use your ice axe, the blades will wear and become rounded.
Here are some tips for sharpening your ice axe:
- During sharpening, you will straighten these lines again and sharpen the tips of each tooth, paying special attention to the hook at the front.
- Also remember that repeated sharpening will physically remove pieces of your blade, so you want to file it as little as practically possible in order to retain as much of the metal as you can.
- When viewing your blade from the top, you want to see a solid piece of metal with straight sides and a sharp front end (that’s the edge of the front tip).
Follow these steps when sharpening your ice axe:
- First, you want to straighten the underside of the first tooth.
- Clamp your blade in the vice grip and file along the front tooth in smooth, even strokes. Take care to follow the original angle set by the manufacturer.
- Next, fix the angle of the front tip. You want straight lines in order to have the sharpest tip possible. The front tip is beveled – follow the same angles set by the manufacturer for best results.
- Maintain a small (0.5mm) flat area in the center of this tip, as this will prolong the lifespan of your ice axe without sacrificing performance.
Once you’re done sharpening, clean your axes properly with soapy water, and then rinse it with clean water. You want to remove any excess metal shavings before storing it.
Dry the axe properly before giving it a light coat of oil to prevent rusting. If you put too much oil on the blade, wipe the excess of with a dry, clean cloth.
Knowing When to Replace Your Axe
Ice axes last incredibly long, but all of them must be replaced at some point.
Here’s a rough guide for when you should consider getting a new one:
- Tooth Alignment: a new axe will have a straight line running along the edge of all teeth, including the front one. If an axe is slightly worn and in need of sharpening, the front hook will be slightly shorter than the rest of the teeth, but when sharpened, its point will still be past the base of the other teeth. If the front tip of your axe blade is either broken off or worn to the point where it is shorter than the base of the remaining teeth, your axe should be replaced. The front tip is one of the most important features of your blade, ensuring a proper grip on the ice, which ensures your safety.
- Damage: Inspect your axe before each climb. When in use, it will get some nicks and scratches, which you probably don’t have to worry about. If there are large dents in your axe or if some pieces are missing, you should replace the axe. The same goes for if your axe is bent.
Sometimes, only parts of your axe need replacement. You can find replacements for all parts of the axe at most outdoor or adventure sport stores, so replace what’s needed.
Conclusion
Your ice axe is an extremely important piece of equipment for ice climbing or alpine mountaineering. I would never feel completely confident in mine or my friends safety if I didn’t take good care of my axes.
First off, you should know which type of ice axe is suitable for your climb. In general, a longer axe is used for cross-country travel and scrambling, while alpine climbing and steeper slopes require a shorter axe.
Make sure to clean your ice axe with water and soap. Store your ice axe in a dry place after it’s dried.
Use a flat metal hand file for sharpening your axe, not a grinder.
Taking good care of your equipment is important. Now that you know how to do that, all I can say is, happy adventures!

Written by Felix
May 5, 2019

About me
Hi! I’m Felix. When I’m not spending time out in the mountains, I like to write about my hobbies. That is how Mountain Homies was created. On this site, I try to gather all the juicy information about Mountaineering that I have learned since I started. Happy adventures!
Recent Posts

The 10 Largest Glaciers In The World (Length, Location & More)
In this article, we’ll have a look at the ten most massive glaciers in the world (by length, not area). Some of these are accessible for hiking and climbing, while others are not…

3 Ways to Spot and Reveal a Crevasse (And Avoid It)
So, how do you spot a crevasse and – more importantly – avoid falling into one? In this article, I will have a look at what crevasses are and how to detect them…
5 Ways of Knowing If Your Climbing Shoes Are Too Big
It has almost become a prestige among climbers to be able to boast about how small and tight climbing shoes can be used. There is therefore a lot of talk…
Related Articles
3 Ways to Spot and Reveal a Crevasse (And Avoid It)
So, how do you spot a crevasse and – more importantly – avoid falling into one? In this article, I will have a look at what crevasses are and how to detect them…
5 Ways of Knowing If Your Climbing Shoes Are Too Big
It has almost become a prestige among climbers to be able to boast about how small and tight climbing shoes can be used. There is therefore a lot of talk…

3 Clever Ways of Crossing A Crevasse
When you’re mountaineering in snow country, you will undoubtedly encounter some crevasses. These are scary, since you don’t always spot them…
Stay Up to Date With The Latest News & Updates
Join Our Newsletter
The owner of this site is a participant in the Amazon Services LLC Associates Program, an affiliate advertising program designed to provide a means for sites to earn advertising fees by advertising and linking to amazon.com.
